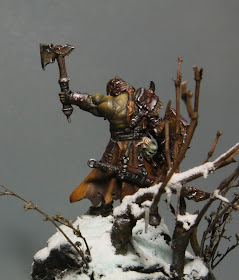
One more step-to-step which was born in the "gym" again but now I was a student and I had a teacher - Landreth. Detailed step by step process of learning can be found on the Russian Alternative forum, and there is an English version avialable to meet a wider audience. Here I will talk about how I pained it changing the teacher's recipes for my existing arsenal of colors, and that came out of it :).
Russian version of this tutor in my personal blog.
Preparation.
The grim job - black ground :). I planned snow, blood splatter and icicles on the base.
So, the composition are ready for primer:


Skin.
1. Base: VMC Carmine red + VMC Flat green
2. Highlights 1: VMC Flat green + VMC Orange brown + quite a bit VMC Carmine red. The base color is only in the shadows.
3. Highlights 2: previous mix + VMA Middlestone *.
4. Shadows 1: in the darkest places a mix of black + VMC Turquoise.
5. Highlights 3: VMC Orange brown + VMA Middlestone *. The most salient points VMC Tan Yellow.
6. Shadows 2: semi-transparent layer VMC Burnt Cad. Red.
* - Landreth used VMS Middlestone instead VMA Middlestone . I did not buy the recommended paint and used the one that was. This was my mistake. These paints are not equal. VMA Middlestone gave me a green tint, which I have not been able to get rid of. VMS Middlestone more yellow, and the skin on the teacher's miniature get a natural color.
Veins: VMC Orange Brown + VMC Turquoise, then pure VMC Tan yellow, at the end - a mix of Tan yellow and VMC Sunny skintone.
Metal.
For steel parts:
1. Base: VMA Steel.
2. Glazing: GW Leviathan purple (wash) + Vallejo Wash Fleshtone shade.
3. In the shadows - spots VMA Gun metalizer, on highlighted places - spots VMA Steel. The process of glazing and restoration metallics continues to create the desired texture.
4. Shadows with diluted black paint.
5. Scratches VMA Steel
6. Applying patches dry and diluted pigment Vallejo Burnt sienna, Forge world Aged dust etc.
7. some rust with VMC Vermillion
8. Final highlights VMA Steel
For gold pieces:
VMC Old gold, then pouring as in steel, highlights VMC Old gold + VMA Steel to clean glare VMA Steel.
The result of steps 1-5:
The next steps:VMC Old gold, then pouring as in steel, highlights VMC Old gold + VMA Steel to clean glare VMA Steel.
The result of steps 1-5:
Skirt and shield.
At the beginning I painted the skirt in red-brown. It seemed to me that it lost in a reddish steel.
Then I decided to make it in bluish-green tones.
But I didn't like this variant. Keep thewarm tones, the skirt went yellow.
For this skirt and shield I used colors (from light to dark): VMC Ochre brown, VMC Orange brown sometimes with the addition of VMC Burnt Cad. Red, GW Scorched brown, in the deep shadows + blue.
Landreth told me about the technique of painting "spots" - sometimes it's called pointillism. All layers except the basic, are applied by spots of liquid paint. The new layer is applied after drying of the previous. So we create a spotty texture.
Metal on board is made with the scheme written above.
Details.
Belts. After a few tries I stoped on the black color with the addition of a brown tint.
Head on his belt: I used GW Catachan green + GW Rooting flesh for base colors.
Sheath and axe: metallic, similar to steel and gold. Plus some places pouring VMC Torquoise.


Amazing!
ReplyDeleteНадя, ты мой кумир! =)
Я покраснела.... :). Мне очень прятно. Буду стараться и дальше :)
DeleteВолшебное всё :), только я бы разделил посты с законченной минькой и тутор.
ReplyDeleteХорошо вписался в подставку. очень дополняют друг друга
ReplyDeleteКстати, я один заметил, что Надя внезапно круто раскачала подставочный скилл и не колется как?
ReplyDeleteПоследнее время пытаюсь не просто красить миньку, а идти от общей идеи с подставкой. Не всегда, конечно :). А по самому рукотворству - просто время, время, время...
DeleteПравильной дорогой идете... товарищ! =))
DeleteНадо к тебе подъехать поучиться у тебя воду делать с волнами.
Hola
ReplyDeleteTeneis un gran blog,con muy buenas cosas
os sigo
un saludo
Welcome! Hope you'll find some interesting and useful here!
DeleteНадь! Фотки на кулях очень маленькие! Переделай на большие пока голосов не очень много, а то все старание не видно((
ReplyDeleteА ну их в ж... эти кули :)
Delete